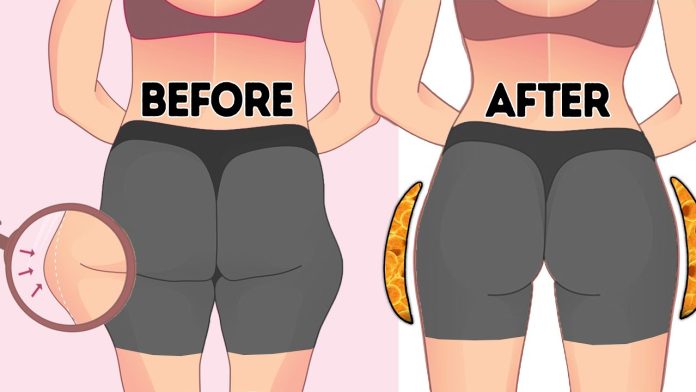
Hips dips, also known as violin hips, are the inward depressions along the side of your body, just below the hip bone. Unlike the smooth curves typically seen on the outer edges of the hips, hips dips have indentations. These indentations can vary in prominence, ranging from barely noticeable to more pronounced. It’s important to note that hips dips are a normal part of your body structure.
Understanding the Causes of Hip Dips
Hip dips occur where the skin is tethered or attached to the deeper part of your thigh bone, known as the trochanter. The visibility of these indentations can vary among individuals due to factors such as the distribution of fat and muscle in your body structure. The width of your hips, the shape of your pelvis, and the distribution of body fat can all contribute to the prominence of hip dips. Additionally, certain types of clothing can make them more apparent.
Exercises to Minimize Hip Dips
If you want to minimize the appearance of hip dips, there are specific exercises you can incorporate into your routine to help build muscle and lose fat.
When performing these exercises, it’s important to use a mirror to ensure proper form. For exercises that target one side at a time, start with your weaker or less flexible leg. This approach allows you to begin with the more challenging side, making the second side feel easier.
Begin with 1 to 2 sets per day and gradually increase the intensity and frequency. Consider alternating different exercises on different days. Aim to spend at least 20 minutes per day on these exercises, and strive to do them 4 to 6 times per week. These exercises primarily target and strengthen the muscles in your hips, thighs, abdominals, and buttocks.
Side Hip Openers (Fire Hydrants)
Side hip openers focus on your outer thighs, hips, and side buttocks. Ensure your weight is evenly distributed between your hands and knees. For added difficulty, you can use a dumbbell behind your knee during this exercise.
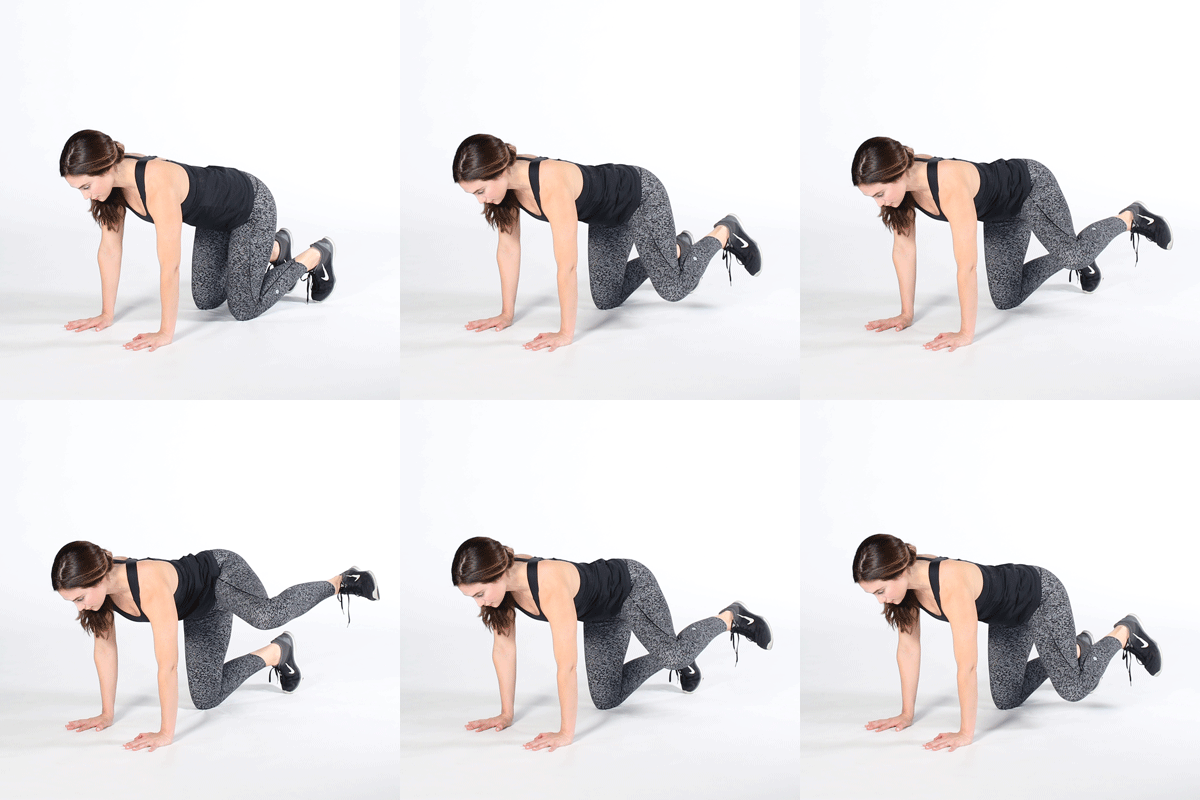
- Start on all fours, with your hands directly underneath your shoulders and your knees directly underneath your hips.
- Inhale as you lift one leg, bending it at a 90-degree angle from your other leg.
- Slowly lower your leg back down without touching the floor, then lift it again.
- Repeat this movement 15 times, and on the last repetition, pulse your leg 10 times in the upper position before lowering.
- Switch to the opposite side and repeat the exercise.
Standing Kickback Lunges
Standing kickback lunges help improve balance and stability while targeting your thighs and buttocks. Keep your front leg and foot engaged, and engage your core throughout the exercise.
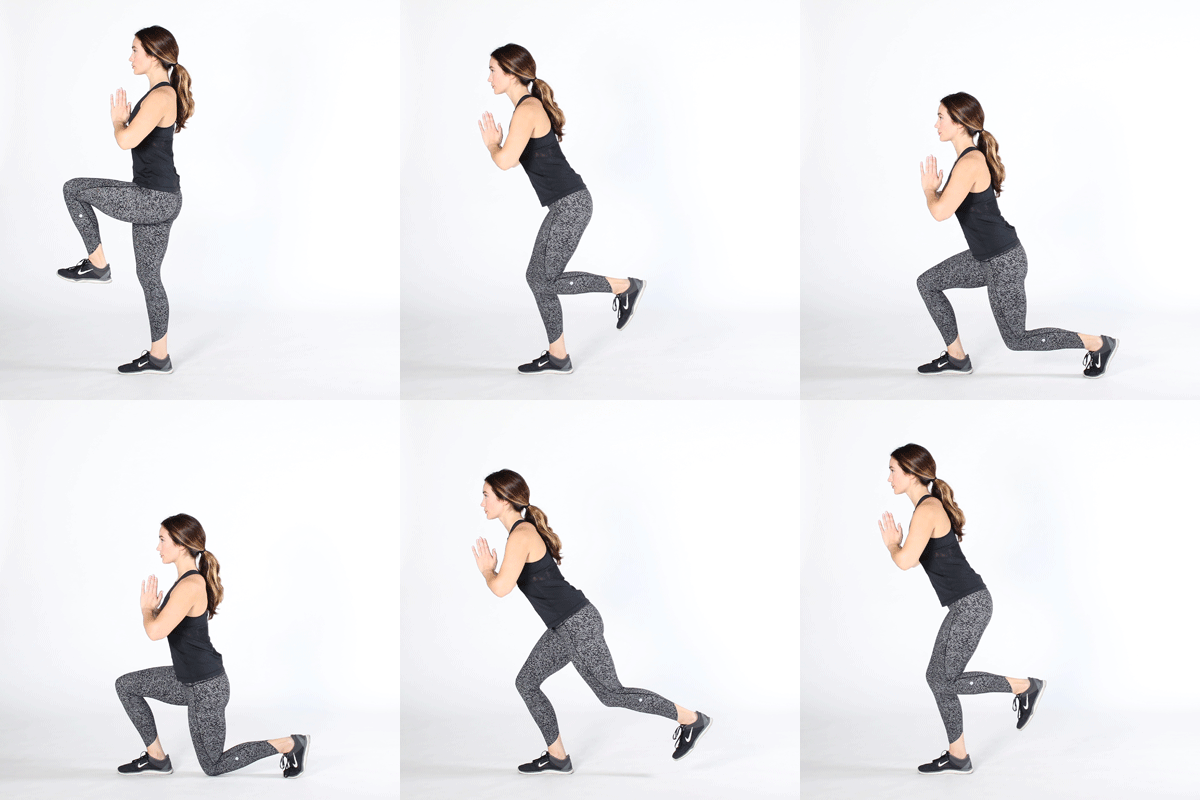
- Start in a standing position with your hands in front of your chest in Prayer pose.
- Inhale as you lift your right knee up to your chest.
- Exhale as you lift your arms up alongside your ears, with your palms facing each other, while stepping your right leg back.
- Sink your right knee down into a lunge, keeping your toes facing forward and staying on the ball of your back foot.
- Inhale to lift your right knee back up to your chest, simultaneously returning your hands to the prayer position.
- Perform 12 lunges, and on the last repetition, keep your leg back and pulse up and down 12 times.
- Repeat the exercise on the opposite side.
Standing Side Leg Lifts
Standing side leg lifts target the muscles along the sides of your hips and butt, with a potential stretch in your inner thigh. Maintain steady and controlled movements, avoiding jerking or rushing. Keep your body straight and avoid leaning to either side. For added difficulty, you can use ankle weights.
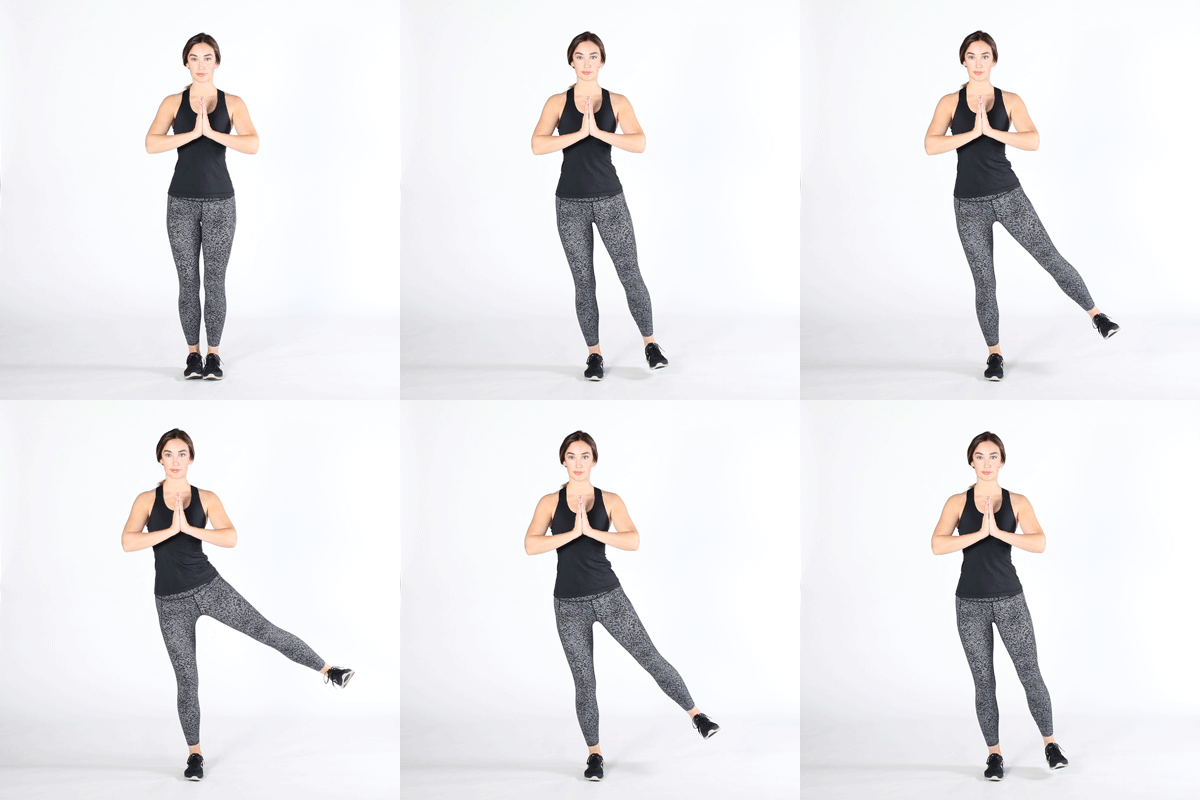
- Stand facing forward with your left side near a table, chair, or wall for support.
- Use your left hand for balance and support, rooting into your left foot and lifting your right foot slightly off the floor.
- Inhale as you slowly lift your right leg to the side.
- Exhale as you slowly lower your leg and cross the opposite leg over.
- Perform 12 leg lifts on both sides.
Squats
Squats are effective for toning your thighs, hips, and butt. Maintain a straight back and forward-facing toes. Engage your abdominal muscles for additional support. You can hold a dumbbell while performing squats.
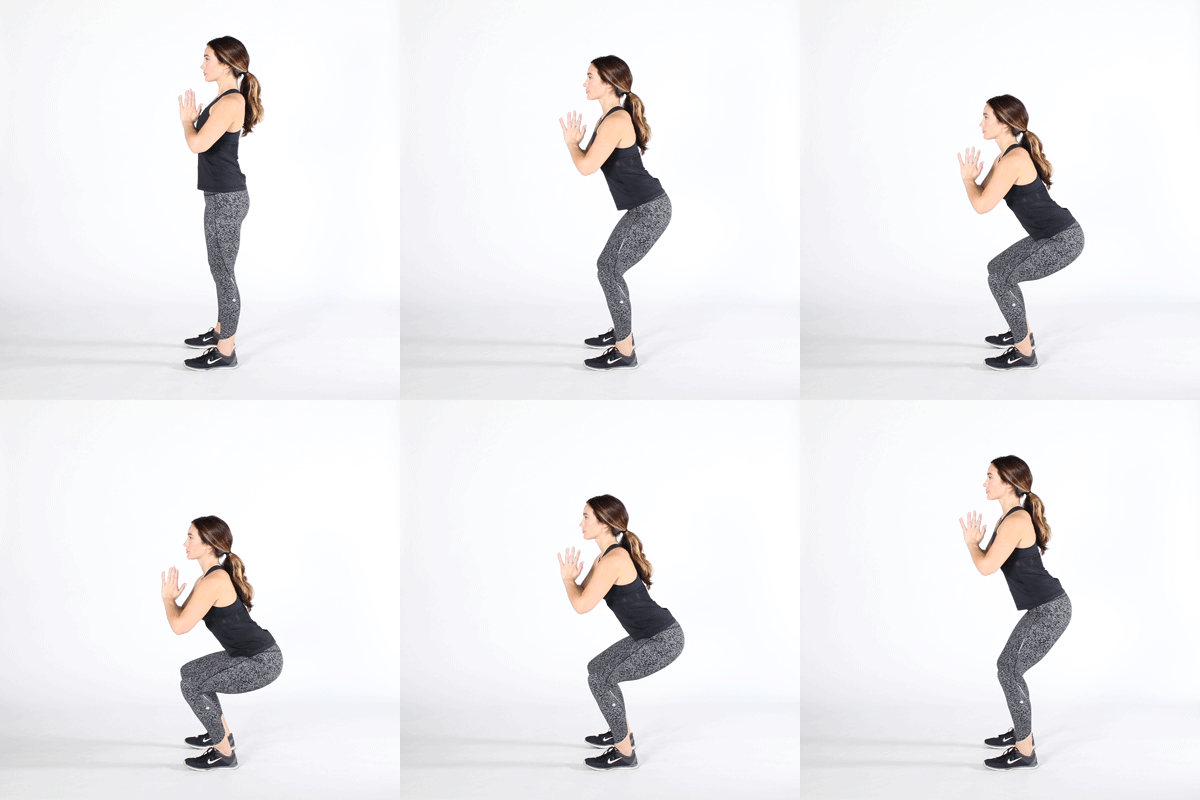
- Stand with your feet slightly wider than your hips.
- Exhale as you slowly lower down, as if sitting into a chair.
- Inhale as you stand back up.
- Repeat this sequence 12 times.
- On the last repetition, hold the lower pose and pulse up and down 12 times.
Standing Side-to-Side Squats
Standing side-to-side squats target the sides of your legs, buttocks, and hips. Keep your butt low throughout the exercise. Squat a bit lower each time your feet come together, and avoid fully standing up. Ankle weights can be used to increase the difficulty.

- Start in a standing position with your feet close together.
- Come down low into a squat position.
- Move your right foot to the right.
- Bring your left foot to meet your right foot.
- Extend your left foot to the left.
- Bring your right foot over to meet your left foot.
- Perform 10 of these squats on each side.
Side Lunges
Side lunges engage your entire leg and help define your hips and buttocks. Keep both feet facing forward. You can hold a dumbbell while performing these lunges.

- Stand with your feet directly underneath your hips.
- Root into your right foot as you step your left foot over to the left.
- Plant your left foot on the ground and lower your butt down, bending your left leg while keeping your right leg straight.
- Continue pressing into both feet.
- Stand up and bring both feet back together.
- Perform 12 lunges on each side.
Side Curtsy Lunges
Side curtsy lunges target your thighs and the side of your buttocks. Stay low to the ground throughout the exercise, and keep the toes of your front foot facing forward. Ensure you step out to the side properly. You can also perform these lunges while holding a dumbbell.

- Start by standing with your feet together.
- Lift your right leg and bring it behind your left leg.
- Drop your right knee down into a curtsy lunge.
- Bring your right foot in front of your left foot.
- Repeat the exercise on the opposite side.
- Perform 15 lunges on each side.
Glute Bridges
Glute bridges target your buttocks and thighs. Engage your abdominals to support your body and work your stomach muscles.
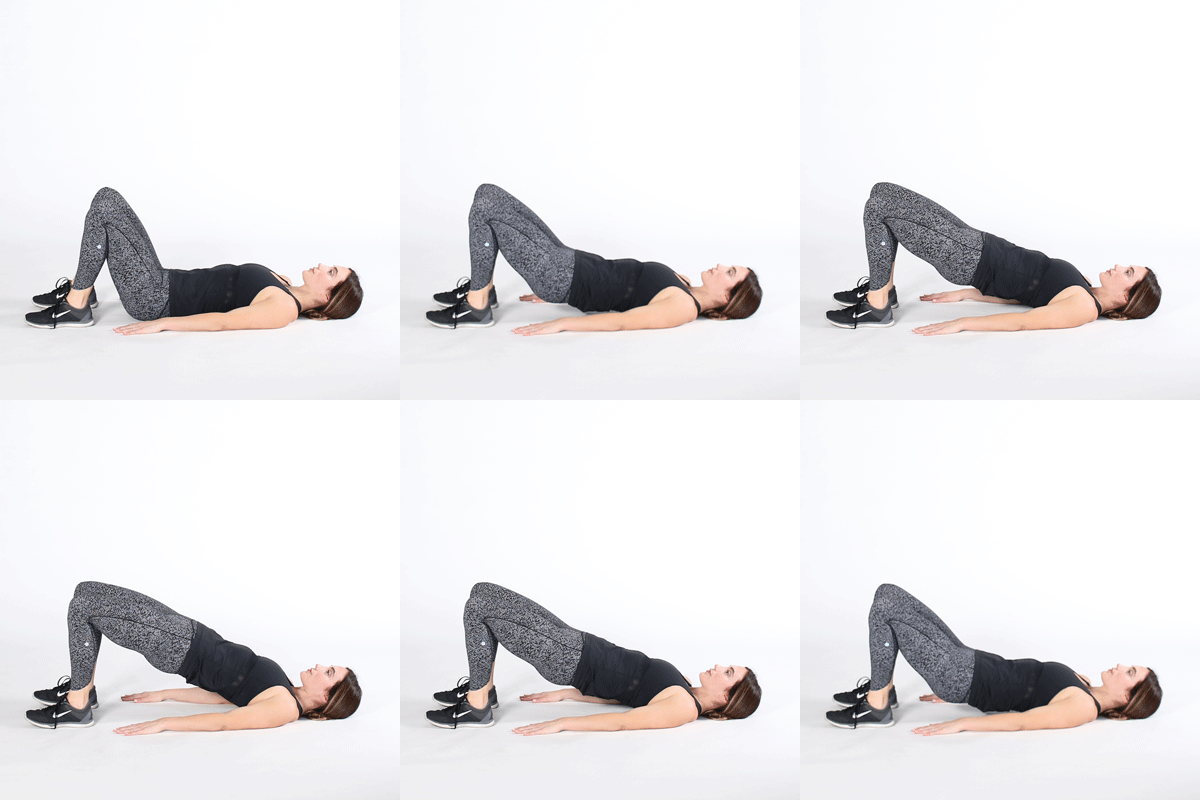
- Lie down on your back with your arms alongside your body and your knees bent.
- Position your feet slightly wider than your hips.
- Inhale as you slowly lift your hips and butt up.
- Exhale as you lower back down.
- Repeat the exercise 15 times, and on the last repetition, hold the upper pose for at least 10 seconds.
- Then, carefully bring your knees together and apart 10 times.
Leg Kickbacks
Leg kickbacks help lift your butt. Keep your core engaged to protect your lower back, and perform the movements slowly. Ankle weights can be used for added difficulty.
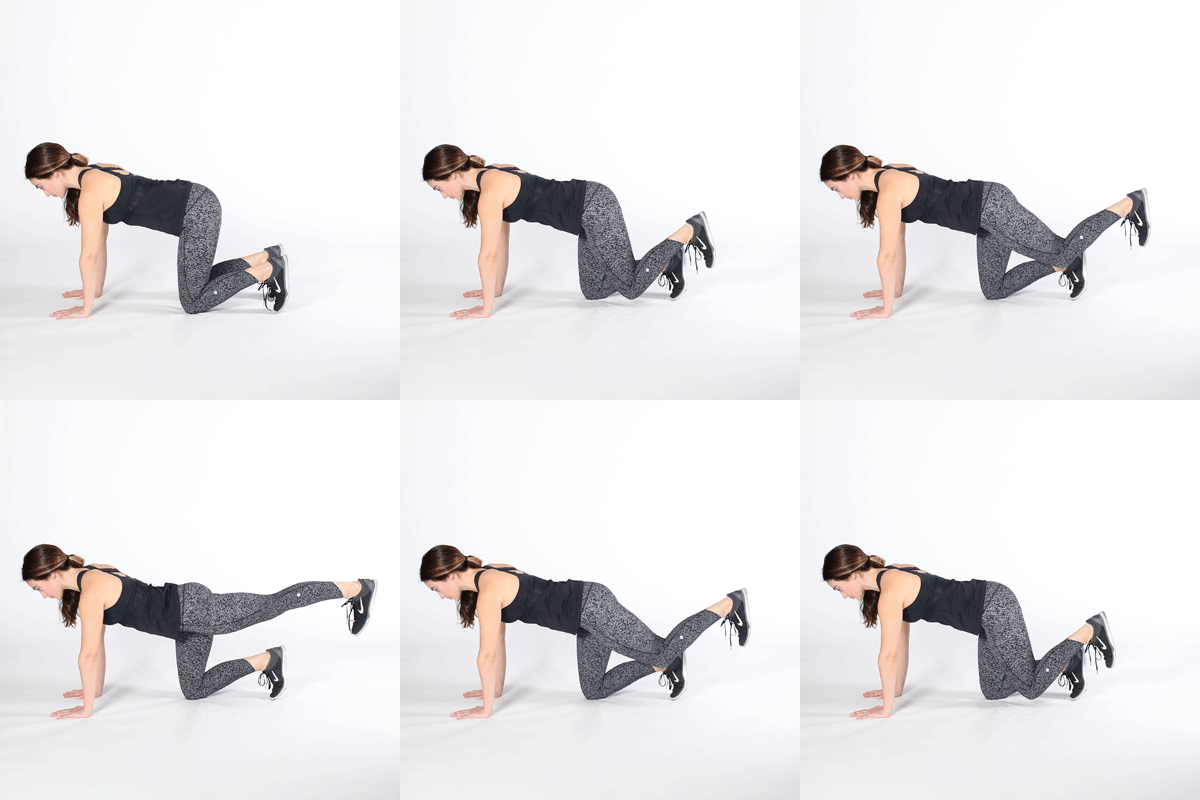
- Come onto all fours, with your hands underneath your shoulders and your knees underneath your hips.
- Extend your right leg straight back, then slowly lift it as high as possible.
- Lower your leg back down without letting your foot touch the floor.
- Perform 15 repetitions, and on the last repetition, keep your leg lifted parallel to the floor. Pulse your leg up and down 15 times.
- Repeat the exercise on the opposite side.
Lying Down Side Leg Raises
Lying down side leg raises target your outer thigh and butt. Use the muscles in your hips and butt to perform the movements. Ankle weights can be used for added difficulty.
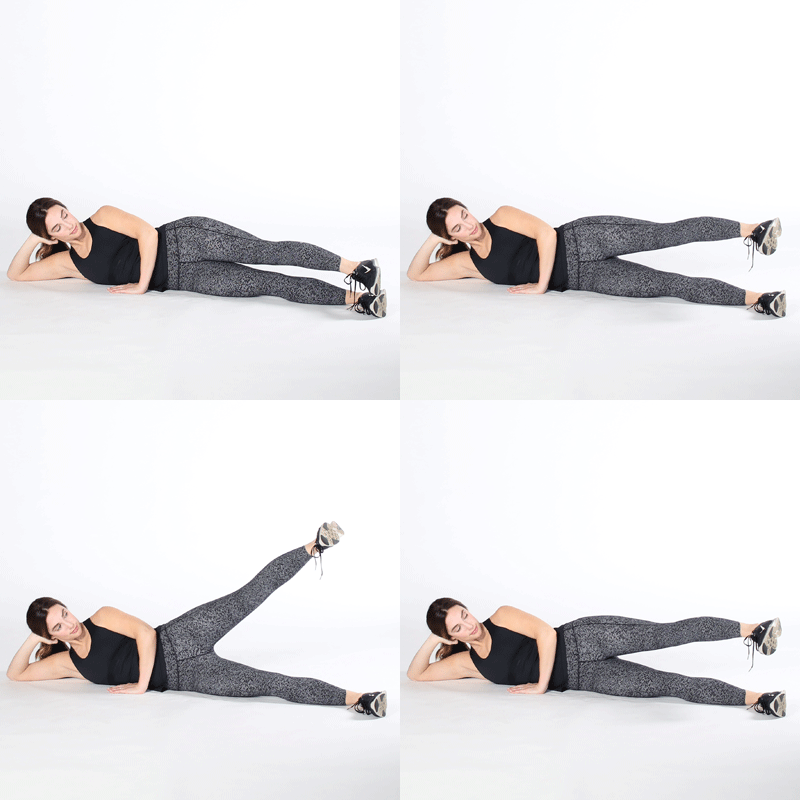
- Lie down on your right side, ensuring your body is in one straight line.
- Bend your right elbow and use your hand to support your head, or keep your arm down on the floor.
- Keep your left hand on the floor in front of you for support.
- Slowly lift your left leg up into the air.
- Lower your leg down without letting it touch your right leg.
- Perform 20 repetitions, and on the last repetition, keep your leg at the top and do 20 pulses.
- Repeat the exercise on the opposite side.
Lifestyle Changes to Minimize Hip Dips
In addition to exercise, making certain lifestyle changes can help minimize the appearance of hip dips. Prioritize creating a healthy lifestyle by exercising regularly, eating well, and taking good care of yourself.
Increasing your water intake and ensuring you consume enough calories are essential. Carbohydrates can provide added energy for maximizing your workouts, while lean protein can help build muscle mass. Include plenty of healthy fats, calcium, and fiber in your diet. Avoid processed junk food, sugar, and alcohol. Make smart food choices, but also allow yourself occasional indulgences.
Balance your fitness routine by incorporating exercises that target other parts of your body. To transform your body, it’s important to engage in a variety of exercises. Additionally, incorporate different types of cardio workouts into your routine and aim to be physically active throughout the day. Consult professionals such as doctors, nutritionists, or fitness experts for guidance.
The Bottom Line
It’s important to remember that results may be gradual, and it may take weeks or months before noticeable changes occur. Maintain a positive mindset about your body and practice positive self-talk. Focus on the aspects of your body that you love.
Stick to a routine or wellness plan that makes you feel good, and set both short-term and long-term goals for yourself. Achieving these goals will help you feel and look better. Remember, the first steps toward your goals start now.

