
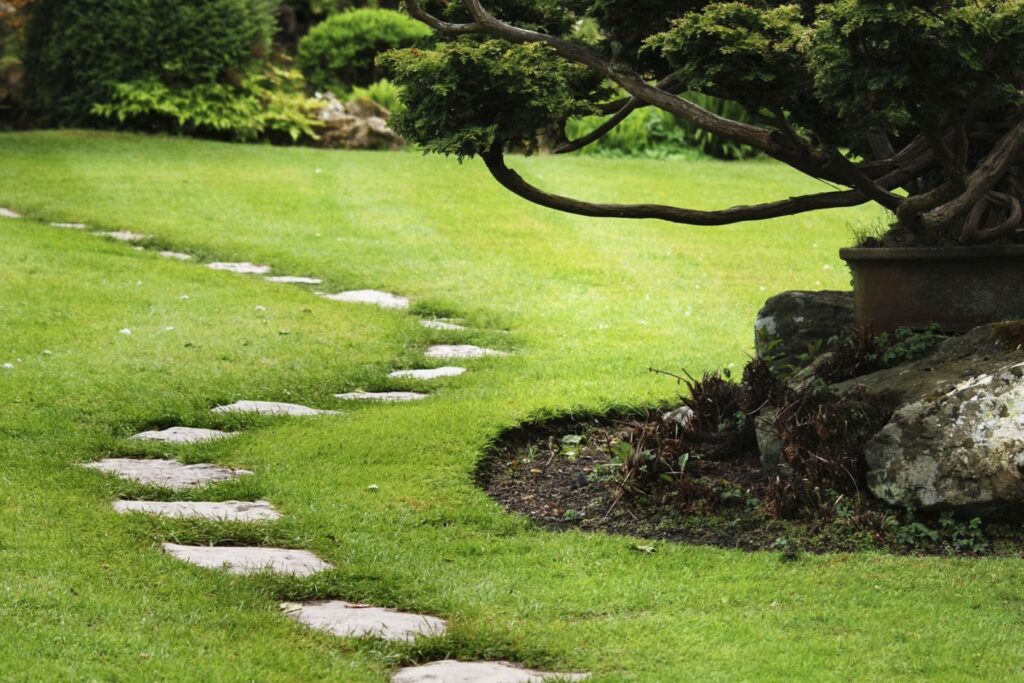
Recently, I needed to connect the vegetable garden to my compost corner, 4 to 5 meters apart from each other. I wanted to be able to bring my green waste there all year round without carrying out major work such as that required to create a driveway. The Japanese steps then sounded obvious…
I love Japanese steps. They are often present in Japanese gardens and, with us, they allow to bring a little fantasy to a lawn or to draw a discreet passageway to another compartment of the garden. I usually put them on the route of a busy path. It saves me from trampling the lawn. But they’re also handy for not getting your feet wet when the grass is wet. Beware, however, of the pitfall of putting them everywhere, because if they bring an undeniable decorative touch, their proliferation will produce the opposite effect.
The route: straight or winding?
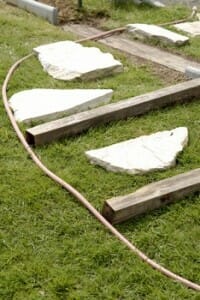
I really like the curves in the garden. I find that they invite you to stroll. I use a garden hose to materialize a winding path and I hold it to the ground with the help of small wire pins that I plant on either side of the hose.
Straight lines attract me less. They give me the impression of going too quickly straight to the point. On the other hand, if the stepping stones used are all identical, the effect of order and perspective obtained by aligning them is more graphic. To materialize a very straight line, a line stretched between two stakes is enough.
What is the ideal distance between two Japanese steps?
It is that of a normal walking step. Don’t risk doing the splits! No need to trample either. Anyway, before digging, I place the slabs on the grass, in their location and I test the spacing. This is the best way not to be mistaken! I thus rectify the distance if necessary while keeping the alignment given by the pipe or the cord.
Lawn cutting
The grass is easily cut around the slab using a flat spade or a garden knife. I wait for it to rain before doing it. Otherwise, I water a little if the soil is too dry ( I’m not going to empty my recovery water tank either! ). I then remove the grass and all the roots. Then I dig the equivalent of the thickness of the step plus a good 5 centimeters. I scrape the bottom well with a trowel to even out and level.
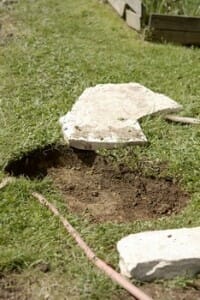
I then pour 4 to 5 centimeters of sand that I level. Then I lay the slab flat and I tap it lightly with a mallet until I get a good flatness. A level allows me here to control the horizontality. The slab must not be flush but remain set back 1 centimeter from the surface of the lawn . This facilitates the passage of the mower whose blades are not likely to catch the roughness.
All that remains is to fill it with fine sand around it. I tamp it first with my fingers before watering it abundantly so that it goes to plug the holes. Last thing: I always sow a little grass to speed up the integration of steps into the lawn.
Different types of stepping stones.
There is a wide variety of materials, shapes and colors.
Reconstituted stone is ideal and perfectly imitates other materials such as wood for example. It also takes on a multitude of shapes and colors and everyone will find a favorite model. This type of step is very easy to lay and fits into any style of garden. Some models even bring a bit of eccentricity, such as those that diffuse a soft white light after dark. The other side of the coin is their price! These steps are generally sold individually and the addition at the cash desk may be painful.
Fortunately, it is also possible to use other less expensive materials and give free rein to your creativity. Take bricks or cobblestones for example. There is often a large quantity left at the end of the project and it is not uncommon to find second-hand ones on the classifieds (they are sometimes weathered, which does not displease me). They lay flat and you have to combine several to get enough surface to put your foot on. These materials allow you to play with shapes to create designs or geometric figures (squares, rectangles, hexagons, etc.).
My choice, for my small development, was rather oriented towards the natural limestone of the Lot. Its irregular shapes and rough appearance bring a rustic touch to the garden. Some slabs, with generous dimensions, offer very good walking comfort. This material does not slip, even when wet, and does not fear frost. This is a more economical solution, available from €15 per m² at material retailers. (1m² = 5/6 beautiful slabs).