Not all is lost if you discover a hole in your sweater. If you take the time to patch that hole, you can keep wearing that sweater for many more seasons. You can save yourself a lot of time and effort by taking those few minutes to mend your sweater instead of having to buy a new one. And you can be sure of that.
Hole repairs in sweaters can be accomplished in a variety of ways, but before beginning, you’ll need to decide on two crucial factors:
- Is it more important to you that this repair not be seen, or that it adds some style?
- Where do you stand in terms of expertise and resources?
First, let’s just jump the mending queue–let’s just hide that darn hole
If the hole is in a place where you can easily conceal it with a badge or brooch. You may add more brooches to play up the idea and make a statement, like Orsola de Castro did with her blazer with the cluster of brooches that began with covering up a hole.
And that’s a “repair” that takes less than a minute.
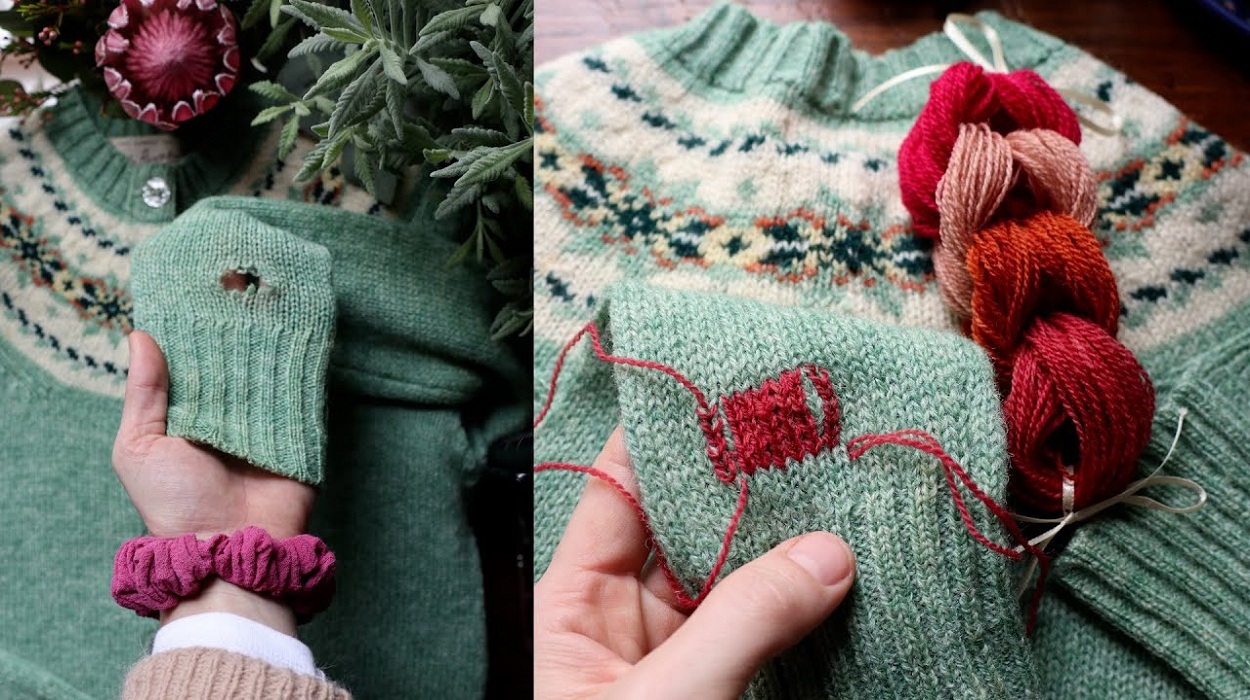
Replicate Stitch – aka Swiss Darning
For worn-out spots on a sweater, like the elbows, you can make the area stronger by using replicate stitches and something thicker than sewing thread, like light yarn or pearl cotton.
When you knit, you make little loops. They can look like little “V”s, loops, or even more complicated loops on plainly knit sweaters. The idea behind the replicate stitch is to copy the knitted stitch with a darning needle, yarn/thread, and hand stitches.
Just follow the sweater’s stitches and sew over them. Look for rows of Vs that go across and up the worn area. Start copying the stitches of the worn area one or two rows away on all sides so you can anchor your yarn into the sweater where it is not worn down. Weave the yarn ends through the sweater and inside.
This works best for a thicker sweater so you can see the stitches and maybe match the yarn weight of the sweater.
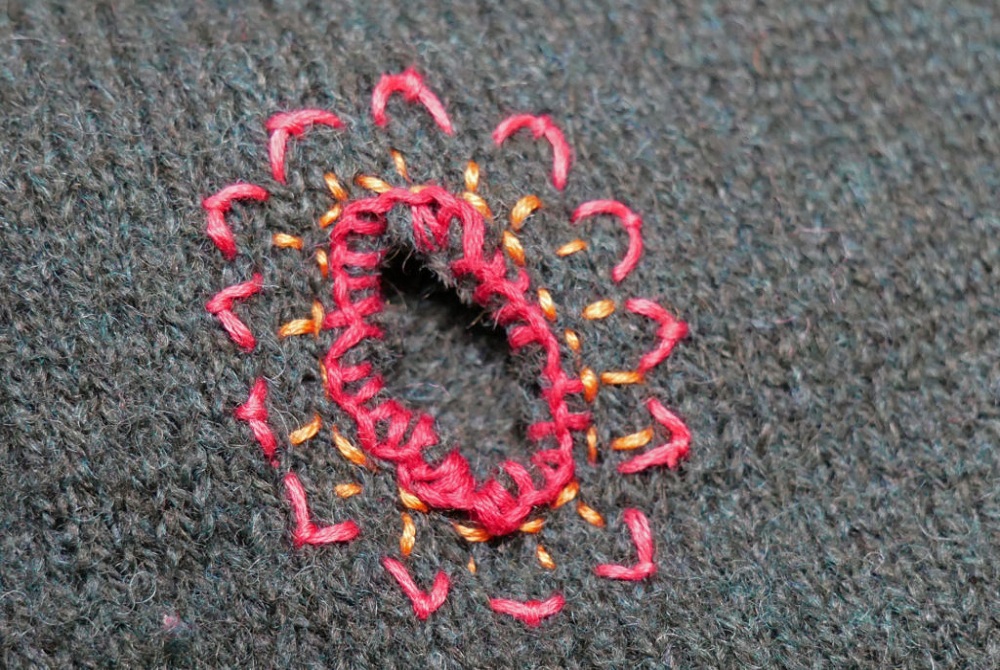
Embroidery
This method doesn’t fix the hole as much as it keeps it from getting bigger. It’s more like what’s called “Visible Mending.” A chance to add a decorative element or some color to the sweater, but you’ll still have a hole when you’re done.
If the hole has any rough edges, cut them off. Look for runs that are coming out of the hole. You need to sew those back together as part of this fix (bring the two sides together).
Use a blanket stitch to sew around the hole. You can put these stitches close to each other or far apart.
You could add more stitches to make a flower, a mandala, a donut, or something else out of the hole.
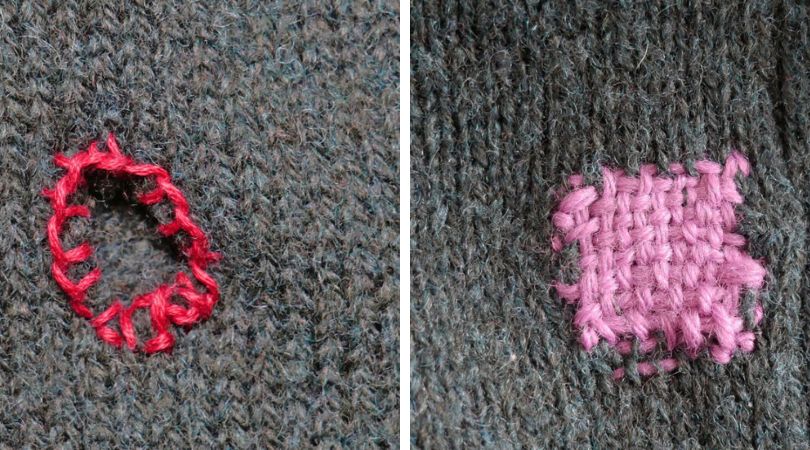
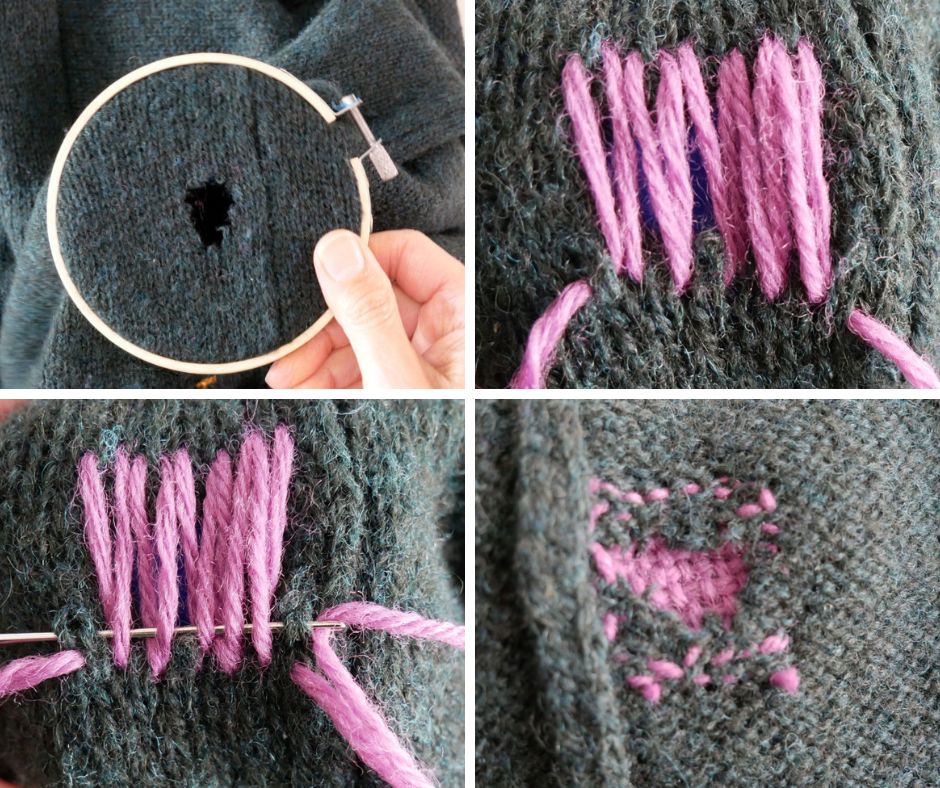
Basket Darning
This is the conventional way to darn. It’s a way to weave, and it’s a lot of fun. My example just covers the hole, but you could extend the darning past the hole to make a shape, like a heart.
If the hole has any rough edges, cut them off. Look for runs that are coming out of the hole. You need to sew those back together as part of this fix (bring the two sides together).
You can use yarn, pearl cotton, or embroidery floss (for small holes). Since you are working on the outside of the sweater, you need to keep the two layers apart. Use a darn mushroom if you have one. (Put it under the hole and tie the sweater around the stem with a piece of yarn or a rubber band, so that the hole is over the cap of the wooden mushroom. Not tight, but not loose either.
Most of us don’t have a darning mushroom, so we can use an embroidery hoop to hold the repair area tight and separate from the rest of the sweater.
You’ll start by stitching rows of yarn over the hole in a vertical direction. Anchor the rows of repair yarn to the sweater by weaving them through the stitches around them. Fill up the whole hole. When you start or end a piece of repair yarn, leave a long tail.
Then you’ll make rows across the sweater, anchoring each one by catching a stitch. This time, though, you weave the stitches through the rows of repair yarn that are going up and down. As you weave, move the rows of threads down.
Weave the yarn ends through some of the stitches on the sweater and bring them to the back. Cut off the ends.
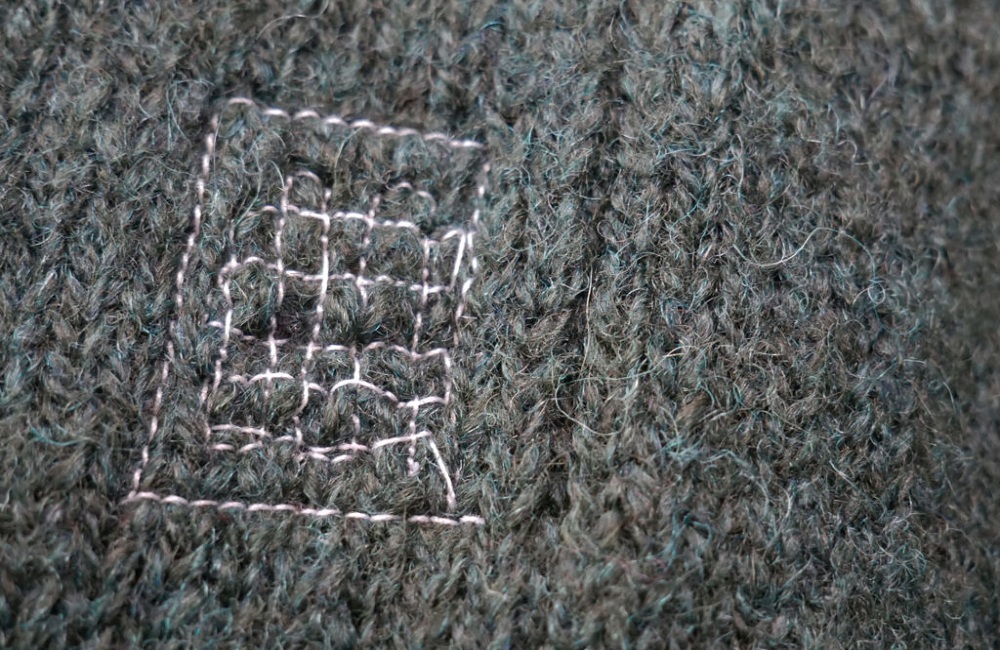
Darning small holes
Small holes can be darned by putting rows of repair yarn or thread across the hole like the spokes of a wheel (red lines above) and then weaving in and out of the spokes (blue line above). For this to work, you need to have an odd number of spokes.
Again, if there are any fuzzy ends in the hole, cut them off. Look for runs that are coming out of the hole. You need to sew those back together as part of this fix (bring the two sides together).
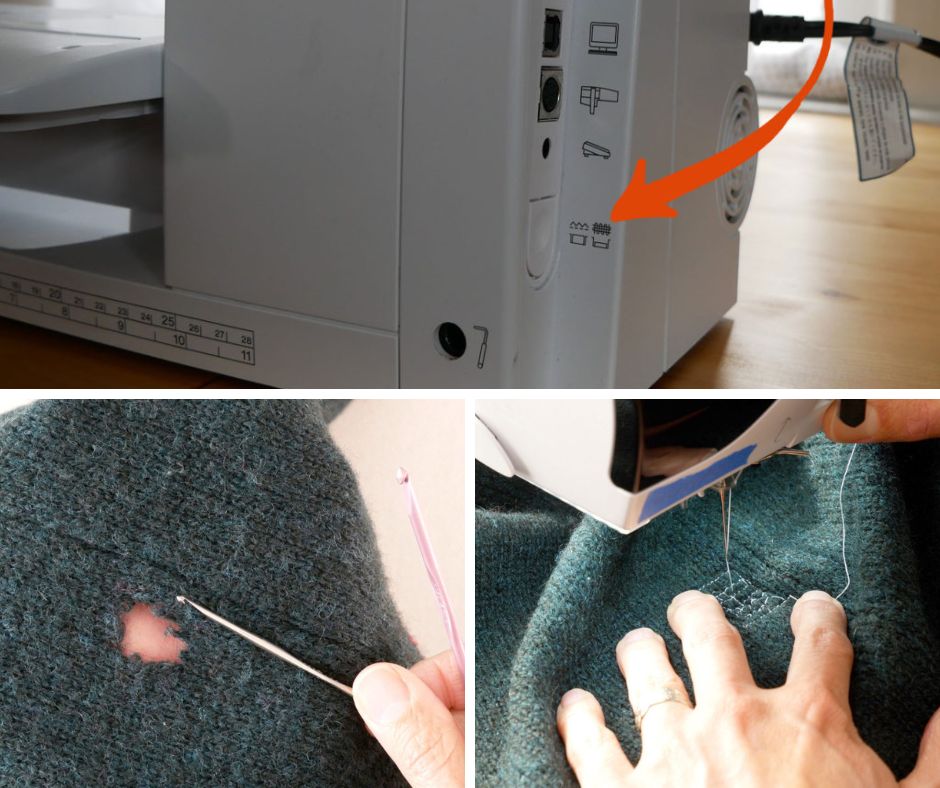
Machine Darning
This is great for small holes and worn spots that are not yet holes. Darning is a feature that comes with a lot of sewing machines. It makes your machine’s feed dogs lower. Even without this option, you can still machine darn.
The option icon is shaped like a grid (like the traditional basket darning stitched mentioned above). But you could darn in any way you wanted, like circles, diagonal lines, spirals, etc.
If your machine doesn’t have a darning feature, you can still change the direction of the fabric by lifting the presser foot.
Place a piece of fabric under the area you want to darn before you darn it. Fix it with a pin. Stitch the cloth around the edge of the sweater. Use a piece of knit fabric, like an old T-shirt or sock, because it will stretch with your sweater and won’t unravel, so you won’t have to do anything to the raw edges.
If you can darn, move the feed dogs down and take the presser foot off. If not, leave the presser foot on.
Look, Mom, no presser foot!
Make rows of straight stitches in one direction, then cross those rows in the other direction. All done. Really.
You need to keep in mind two things: If you use the darning option, you have to move the fabric yourself because there are no feed dogs or presser foot to do it for you.
Remember that your presser foot needs to be “down” for your stitches to come out right. Since there is no foot on your machine to remind you, just check that the lever is turned so that the foot would be down if it were there.
The only problem with this method is that worn elbows have to be fixed from inside the sleeve. It’s not big enough. If the sleeve has a seam, you could open it up to lay the area flat for darning. Then sew the sleeve seam shut again. You could also darn by hand, like in this post about fixing the elbows.
Crochet
Unlike basket darning, crochet is very stretchy and can be shaped to fit any hole (perfect for heels of socks). The main steps are as follows:
Cut off the hole’s edges and any runs. You want the fibers you crochet to be strong.
With a very small crochet hook, slip stitch your yarn to the hole.
Make a single crochet stitch around the hole’s edge. You can switch to a bigger hook after the first row.
Fill in the hole some more.
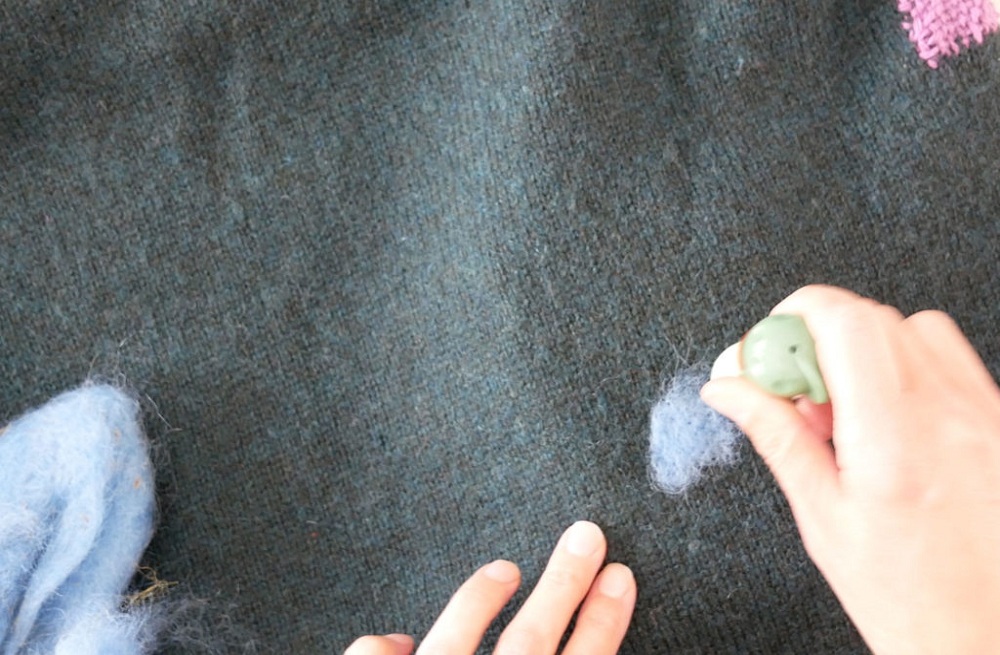
Needle Felting
Wool roving can be needle felted on top of a small hole in a wool sweater, as long as the felting surface is not a towel. I did, and the needle snapped. Use a needle felting mat or foam for this.
foam: beige and dark grey, and a Clover needle felting mat.
This is the best way to fix small holes.
It won’t work on sweaters made of plant fibers like cotton and rayon.
If you don’t want the felted patch to look like a ball of lint stuck on your sweater, use a color that matches the sweater or make a shape with the roving, like a perfect circle or a heart.
It’s easy to do. Just put a small piece of roving over the hole and a little bit past it. Put a mat for needle felting underneath the hole. Move the felting needle into and out of the roving by moving it up and down. The rough animal fibers will start to get tangled up. This keeps the roving in place and covers the hole in the sweater.
You can add more roving to cover the area if you need to. You’ll be surprised at how few things you actually need. The more you felt the roving (by moving the needle up and down), the flatter it will get.

Patching
There are different ways to patch. From what kind of fabric to use for the patch to whether it goes on top, under, or both.
The best materials to use are usually knits because they stretch like a sweater. So you could use an old T-shirt, a sock, or a small patch you knitted yourself if you know how to knit.
If the patch fabric unravels (knits usually don’t, which is another reason to use them), make sure to hem, overcast, or zig-zag the edges of the patch before sewing it on.
On all sides, the patch should be about 1/2 inch or 1 cm bigger than the hole.
Placement: You can put the patch over or under the hole. You could also put a patch under the hole to stop it from getting bigger and strengthen a worn-out area, and then put another patch on top of the patched hole to hide everything.
First, sew the patch to the sweater all the way around it. Then, sew it to the sweater all the way around the hole. Last, sew the hole’s unfinished edge to the fabric patch.
You can add more stitches to this area to make it stronger or not.
A patch on the outside of the sweater that covers a repair only needs to have its edges sewn down.